What do I need to install floor tile?
Selected Tile Material
You have seemingly endless choices when it comes to tile, including different materials, colors, patterns, shapes and sizes. The style of your room and the look you’re going for with the renovation helps you decide which tile to choose.
Not only do tiles come in various colors and designs, they also have different hardness ratings. Ceramic tiles receive a rating based on a hardness scale and divides them into groups. Group 0 tiles are not suitable for floor use, while Group 1 tiles will withstand light foot traffic. Group 5 tiles hold up even in areas of heavy foot traffic. Choose a tile that can handle the amount of foot traffic the area receives.
Adhesive Material
Adhesive is required to keep the tiles secured to the floor. Thin-set adhesive, also called Portland cement mortar, is a combination of cement, sand and methylcellulose. Thin-set adhesive is available as dry-set or latex-modified. Because of its water-repellent properties, latex-modified adhesive is ideal in areas with water exposure, such as bathroom floors. Although there are a few thin-set adhesive products at the ready, most require the addition of water prior to use. Mastic, or organic adhesive, is a pre-mixed tile adhesive. Type 1 mastic is suitable for floor tile installations, whereas Type 2 is not.
Sanded or Unsanded Grout
Your tile work isn’t done after sticking the pieces to the floor. You’ll also need grout to fill in the gaps between the tiles. Cement grout comes in sanded and unsanded varieties. Sanded grout is used in gaps larger than 1/16-inch wide. Because it’s hard to work sand into small tile joints, unsanded grout is used for tiles set close together. Both sanded and unsanded grouts are available dry or pre-mixed, and they come in a wide array of colors. Latex-modified sanded grout is more water-repellent than regular sanded grout and is a common choice for bathroom floor tile. Epoxy grout is more durable and water-resistant than cement grout, but it is more difficult to work with.
Miscellaneous Materials
Although these miscellaneous tile materials are optional, they certainly make the job easier or help the finished product last longer. Spacers are small pieces of plastic that go between the tiles during installation to keep the tile spacing symmetrical. Cement board is useful for slightly uneven or unstable floors. It provides a thin, hard surface ideal for tile. You can install cement board over vinyl flooring, allowing for installation of ceramic floor tile without removing the old flooring. Grout sealer is a clear, protective finish that helps prevent water absorption and staining of the grout. Tile sealer works to coat and protect tile which is useful for sealing porous tile, such as terracotta, prior to grouting. Tile sealer is not needed for glazed ceramic tiles.
Tiling Tools
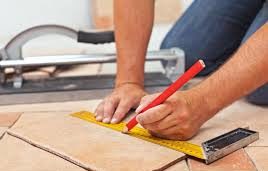
Floor tile installations require both common and tile-specific tools. You need a few easily accessible tools such as a tape measure, a chalk line and a level. Tile-specific tools include a notched trowel, a rubber grout float and grout nippers. Wear safety glasses when using a tile nipper. You may find a grout bag is helpful for getting the grout into awkward places. You will need some sort of tile cutter. A portable tile cutter works with most ceramic tile, but you may need to use a wet saw if working with marble or granite tile.
Tile Installation
Ready To Use Tile Adhesive
Tile adhesive is ready-mixed and specially formulated from OPC, selected fine sand, and additives to improve its essential properties for laying tiles. High performance tile adhesive can be used to lay tiles on existing tiles, on polished cement, on wooden substrates (with the use of primer), or on other special substrates.
Easy to use
It’s very easy to use tile adhesive, it will be already ready to use after just mixing with water. Bagging product makes it convenient for transportation process, providing low dust and clean working space. Tiles are not needed to be soaked, just un-box them and lay.
Fast
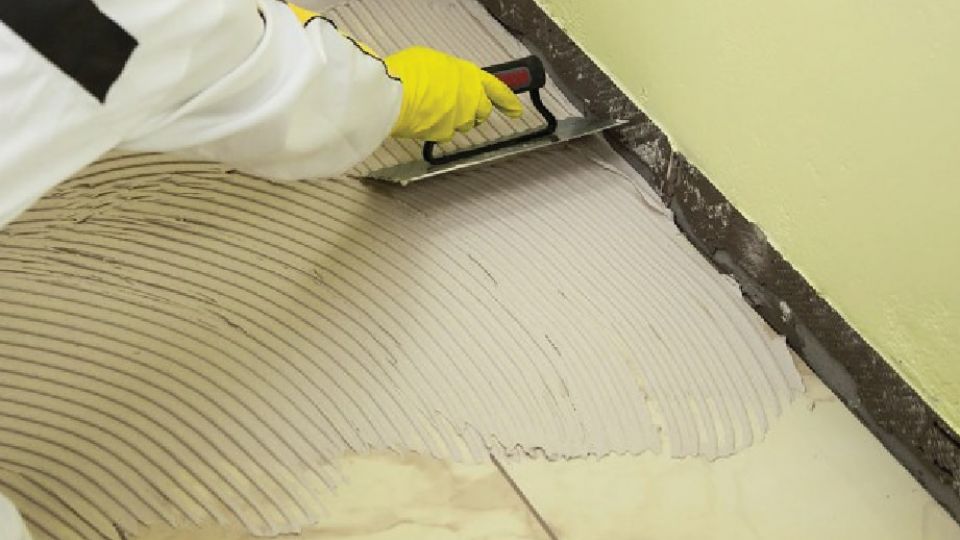
Notched trowel is normally and efficiently used to apply the mixture of tile adhesive on the area of about 1 m2. Tiles are then continuously laid onto notched adhesive and quickly adjusted into the lines.
Working quality
0ptimum setting time of tile adhesive allows tiles to be easily adjusted within a certain period of time. It makes tiles being laid in line and gives the aesthetic final look. Applying tile adhesive with notched trowel provides full spread on back of tiles and will reduce many problems like broken tiles esp. on the corner, water seeping, and stain or efflorescent. Full contact of the adhesive on tiles’ back and substrate provides strong bonding strength and long lasting tiling work.
Variety of work
Tile adhesives are formulated according to specific applications such as to lay tiles, glass mosaics, large-size granito (up from 60 x 60 cm), to lay tiles on polished substrates, on dry wall system, on existing tiles without removing them, on external areas, parking areas, industrial areas, in swimming pools, and many more.
Economical reasons
Laying tiles by using tile adhesive with notched trowel requires less amount of material. Adhesive layer is a lot thinner than the mixture of sand-cement, and this leads to lighter load to building structure. A bag of 20 kg tile adhesive can be used to lay tiles on the average area of 4 – 5 m2. A bag of 25 kg tile adhesive can be used to lay tiles on the average of 6 – 7 m2.
Area coverage depends on substrate smoothness, working tools, and skill of tilers.
How Do I Choose Good Quality Of Tiles?
Following are the points need to be checked for tile works,
1. Living, Dining, Kitchen & Bedrooms – Flooring:
- Tiles should be laid with zero slope. So overall area should be in level without any slope or undulations
- Levels between tile joints should be equal; Tile joints spacing should be equal.
- Tile joints has to be filled with suitable grouts. Check the grout for proper filling, i.e., without gaps, undulations & colour variation
- Tile damages & chip offs has to be checked; Colour variation has to be checked.
- Skirting tiles – offset from wall should be equal; edges & corners should not be sharp; floor tile’s joints line should match with skirting tile; Also check for damages & colour variations
- Hollowness – randomly tap on the tiles and observe for hollow sound.
2. Toilets, Utilities & Balconies (TUB) – Flooring:
- Slope: Check floor slope by poring a bucket of water. Water has to drain fully with in two minutes.
- Check for the position of floor trap; it should be placed such a way that it facilitates water draining properly
- Levels between the tiles should be equal; Tile joint spacing should be equal.
- Tile joints has to be filled with suitable grouts. Check the grout for proper filling, i.e., without gaps, undulations & colour variation.
- Tile damages & chip offs has to be checked; Colour variation has to be checked.
- Skirting tiles – offset from wall should be equal; edges & corners should not be sharp; floor tile’s joints line should match with skirting tile; Also check for damages & colour variations
- Hollowness – randomly tap on the tiles and observe for hollow sound
3. Toilets, Utilities, Balconies (TUB) & Kitchen – Walls:
- All walls should be in plumb and right angle
- All the corners has to be filled with Silicone sealant (Sanitary Sealant)
- Levels between the tiles should be equal; Tile joint spacing should be equal.
- Cut tiles around the plumbing fixtures & Electrical boxes should be cut in proper shape and the cut edge should not be visible after fixing Plumbing & Electrical fixtures
- Tile joints has to be filled with suitable grouts. Check the grout for proper filling, i.e., without gaps, undulations & colour variation.
- Tile damages & chip offs has to be checked; Colour variation has to be checked.
- Hollowness – randomly tap on the tiles and observe for hollow sound.
Pros of SnapStone Porcelain Flooring
- Installation is easy. This is the main advantage to SnapStone, and it is a big one. This is a very easy floor for DIYers to install.
- Better sound-deadening. The bottom tray layer on SnapStone is made from a rubberized material that deadens sound transmission. This is a quieter floor than traditional ceramic tile.
- Can be installed over existing flooring. While tear-out of old flooring is often necessary with traditional ceramic tile installation, SnapStone can be installed over wood, vinyl, or concrete floors.
Cons of SnapStone
- Limited selection: Although selections have increased in recent years, there is still a relatively small selection of SnapStone when compared to thousands of colors and styles available in standard ceramic tiles. Currently, SnapStone offers 14 types of 6 x 6-inch tiles; 3 types of 18 x 18-inch tiles; 27 types of 12 x 24-inch tiles; and 7 types of 6 x 24-inch tiles.
- More expensive. SnapStone costs $5 to $7 per square foot when purchased from a home center. Even when you consider that you won’t have to buy cement board underlayment, SnapStone is more expensive than most stock ceramic tile. But costs are still more reasonable than for many high-end designer porcelain tiles.
- The floor flexes. Unlike a mortar or thin-set installation, a SnapStone floor will flex somewhat underfoot. This is one reason why this system uses a flexible urethane grout rather than traditional mortar grout, since grout lines would crack without a flexible filler. This tendency can be countered somewhat if the subfloor is very solid and well constructed.
- Structural reinforcement may be necessary. SnapStone installation guidelines carefully delineate how much floor deflection is allowable in the floor framing. This may require additional carpentry work if the floor is too bouncy.
Unsuitable or Poor Materials
Some materials should be avoided as underlayments for ceramic tile:
- Interior-grade plywood: This kind of plywood will swell upon contact with water, so it is best to avoid it as an underlayment.
- OSB sheets: Like interior plywood, OSB does not perform well with water.
- Multiple layers of vinyl: One layer of the vinyl floor is fine. More than one layer isn’t.
- Perimeter-bond vinyl: Sheet vinyl must have a full bond over its entirety in order to serve as an underlayment for ceramic tile.
- Hardboard: Hardboard sheets such as Masonite do not bear up to any moisture, so avoid them as an underlayment for ceramic tile.
- Drywall or greenboard: Although ceramic tile is sometimes installed directly against drywall or greenboard in the wall applications. It should never be used as an underlayment for floors.